 Editors' note: This post is part of a regularly updated series. For the other parts, check out the related stories below.
All home networks start with a network cable. Even if you plan on using all wireless clients, in most cases you will still need at least one cable to connect the wireless router and the broadband modem. A typical home network needs more than that because chances are you also want to connect a few Ethernet-ready devices to the router.
Knowing how to make your own networking cable is an important, handy skill for a few reasons. First, network cables that you buy at the store are generally grossly overpriced: a 7-foot-long cable can run you $20, almost $3 per foot. Secondly, it's hard to find a ready-made cable that's just the perfect length; most of the time it's either too long or too short. When you make your own, the cable will be exactly the length you want, and if it's not, well, you can make another one or adjust it.
You can also make other hardware parts for the network, including network wall ports and patch panels. As you will see after reading this post, this is a skill that's not only easy to learn, but it doesn't cost much, either. All the tools you need cost less than . Parts, such as patch cable and connectors, are also very affordable.
 The biggest return on this investment, however, is that you may find making and wiring your own network hardware actually fun, and it gives you complete control of your home network. A well-designed wired home network is also the best in terms of performance, since - for right now, anyway - cabling is much faster and more reliable than a Wi-Fi signal. If you want to do serious streaming and data sharing within the local network, running network cables is the way to go.
Now, let's start with the cable itself.
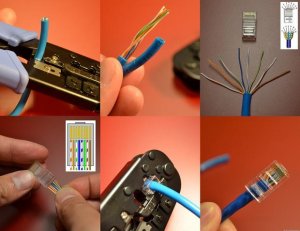
Here are the steps to make your own network cable. Remember, the wiring scheme is the hardest part (click to enlarge). Dong Ngo/CNETThe steps:
- Use the tool to strip the patch cable's jacket about 1.5 inch from one end; you'll find eight color-coded wires (twisted into four pairs) that you'll need to arrange in a particular scheme. (In my experience, it's easier to spread these wires out and put them in the right scheme when you strip more than 1.5 inches of jacket. Later on you can cut the wires shorter if need be.)
 This scheme, from left, is: white/orange > solid orange > white/green > solid blue > white/blue > solid green > white/brown > solid brown. Remembering this order is the hardest part of making the cable.
Note that the wiring scheme above reflects the popular 568B wiring standard, which is recommended. You can also use the less popular 568A wiring standard (white/green > solid green > white/orange > solid blue > white/blue > solid orange > white/brown > solid brown). There's no difference in terms of performance between these two wiring standards, and you can also use both of these wiring standards on one cable (one for each end) to make it a crossover cable used to connect two Ethernet-ready devices directly to each other.
- With these wires pulled out straight and close together in the order above, make sure they are all the same length (you can trim them a bit if needed). Now insert them into a modular plug with the plug's bottom facing you. This step is actually very easy. Despite the small sizes of the parts involved, the plug has pin grooves on the inside to accommodate the wires, and the tiny size means that the wires can't easily go to wrong pins as long as they are properly aligned coming in.
 Check to make sure the wires go into the plug in the right order.
 - Insert the plug (with the wires now inside) into the crimp slot of the tool and crimp it.
Repeat the same step with another plug on the other end of the patch cable, and you have made yourself a network CAT5e cable. A quick calculation shows that a homemade network cable costs just a few cents per foot.
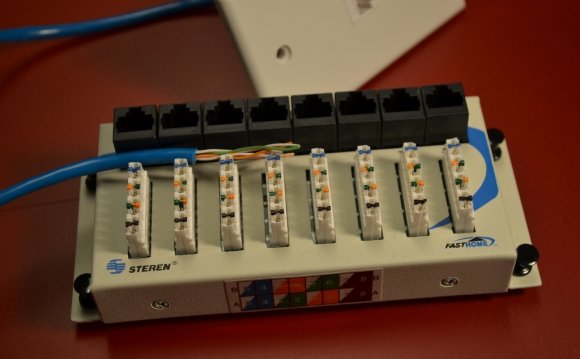
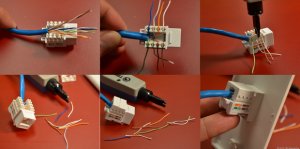
2. Wiring a wall network port
Now that you know how to make your own network cable, let's talk about how to hide it. As you might imagine, it's not a good idea to run a long cable from the router (in the living room) all the way to a home office, with, say, the kitchen in between. Instead, it's better to make two wall network ports, one at the router and the other in the office. The cable connecting these two network ports can be hidden under the floor, on the roof, or behind the wall.
Depending on your home, the actual job of running patch cables behind the wall or under the house, and making both of its ends come out of the wall, can be tricky. You might want to hire a handyman for that job, especially the part where you need to cut holes in the wall. In this post, though, I'm just talking about how you can make an Ethernet jack, with the ends of the patch cable already sticking out of the wall. Again, this is a CAT5e jack, also known as a RJ-54 Ethernet jack. A CAT6 jack has the same wiring, however.
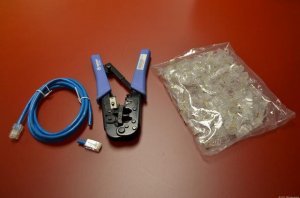
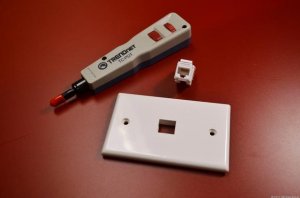
A good punch-down tool is essential to making your own network port. Dong Ngo/CNETWhat you need:
A punch-down tool: This tool costs about $20. I use a Trendnet TC-PDT, which incorporates a blade to cut off extra wires.
Ethernet jack and wall plate: As many as needed. Generally a set of one jack and one wall plate costs around $5. You can buy these separately and you can find a wall pate that can house more than one jack.
YOU MIGHT ALSO LIKE


Share this Post
latest post
-
 Split Ethernet cable into two February 10, 2019
 -
 What is Ethernet Patch Cables? February 5, 2019
 -
 Military Fiber Optic cable January 31, 2019
 -
 Networking cable types January 26, 2019
 -
 Fluke Ethernet cable Tester January 21, 2019
 -
 Molex Fiber Optic cable January 16, 2019
 -
 Buy Ethernet Cables online January 11, 2019
 -
 Harford County cable Network January 6, 2019
 -
 Serial to Ethernet cable January 1, 2019