- When installed on a live system, invisible laser radiation may be present. Do not stare into connector endface or view directly with optical instruments.
- Wear safety glasses when working with optical fiber.
- Dispose of all scrap fibers to avoid getting fiber slivers.
Scope
The following guidelines are intended as a general overview of important issues related to the installation of fiber optic cable.
INSTALLATION SPECIFICATIONS
For a proper cable installation, it is important to understand the cable specification. The two most important specifications are the tensile loading and bend radius specifications. It is very important to adhere to these limits.
Tensile loading
Although there are two different types of tension in fiber optic cables, the important tension for the installation is the maximum load the cable can be subjected to without causing permanent damage. We call it the “maximum load installation” and it is measured in Newton or pounds. The “maximum load installation” can also be known as “short term tension”, “dynamic load”, “installation load” or “installation tension”.
Whenever possible, the tension of the installation should be monitored. The tension can be measured with a dynamometer, or with a pulling wheel. Breakaway pulling eyes are available which separate if the tension reaches a preset level. The use of a swivel is recommended when pulling the cable in tray. The swivel allows the cable and pulling rope to twist independently.
If pulling a cable in an outside plant conduit, the use of approved lubricants can help minimize friction. The use of corrugated innerducts can also help reduce the amount of tension needed to pull the cable. When installing loose-tube cables, the use of sealer is recommended to prevent gel migration.
If a run is too long, or if several bends are in the conduit, intermediate pull boxes should be used to separate one pull into two or more shorter pulls. A cable should not be pulled through more than two 90° bends at one time. If three or more 90° bends in a continuous run are unavoidable, the cable should be installed from a central point, unreeled into a figure-eight, and then backfed to complete the installation. Sharp bends may increase cable tension, so it is best to install cable in sequences that minimize stress and labor costs.
When running cable vertically, take note of the cable weight. Install cables in a sequence that applies the least amount of strain on the cable. For example, most vertical chasers in buildings tend to be congested at the lower floors; instead, try to start your installation at the top and work down the building, thereby eliminating most of the cable installation by the time you reach the lower floors. After installation, the strength member of the cable will need to support the hanging cable. If a long vertical run is necessary, cable should be secured at each floor and service loops should be placed every three floors, at a minimum. This procedure will help distribute the weight of the cable vertically and will facilitate access to moves, adds and changes (MACs), if needed at a later date.
Bend radius
There are two types of bend radius:
- The short term minimum bend radius, or dynamic bend radius, is the tightest recommended bend while installing cable at the maximum rated tension. It is the larger of the two specified bend radii. Throughout the pull, the minimum bend radius must be strictly followed. If a location exists in the middle of a run where a relatively tight bend is unavoidable, the cable should be hand-fed around the bend or a pulley can be used.
- The long term bend radius, or static bend radius, is the tightest recommended bend while the cable is under a minimum tension. It is the smaller of the two specified bend radii. After the pull is complete, the cable can be bent more tightly to fit into existing space, but not to exceed the long term minimum bend radius.
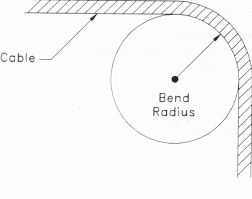 Figure 1: Bend Radius
Table 1: Typical Bend Radius Specification
|
Short Term (Installation) |
Long Term (Installed) |
|
|
Outside Plant Cable |
20x Cable Diameter |
15x Cable Diameter |
|
Premise Cable |
10x Cable Diameter |
Always follow the manufacturer's guidelines for minimum bend radius and tension. Failure to do so may result in high attenuation (macrobends) and possible damage to the cable and fiber. Guidelines are normally supplied with the cable manufacturer specification sheets. If the bend radius specifications are unknown, the industry de facto standard is to maintain a minimum radius of 20X the diameter of the cable.
The minimum bend radius must also be adhered to when using service loops. Fiber optic splice trays and patch panels are designed to accommodate the bend radii of the individual fibers, but outside of the hardware, extra care must be taken.
INSTALLATION TOOLS
Gripping Techniques
General
To effectively utilize all of the available strength in the cable, the strength member must be used. The manufacturer’s specification will identify the strength member(s) in the cable.
Cables with aramid yarn as the strength member
For cables using aramid yarn alone as the strength member, the jacket can be removed exposing the aramid. The aramid should be tied in a knot with the pull rope, so that the jacket will not be inadvertently used for strength.
Optionally, the jacket can be tied into a tight knot before pulling. After pulling, the knot should be cut off.
Figure 2: Distribution Cable Tied in a Knot Cables with aramid yarn and an e-glass central memberFor cables using aramid yarn and an e-glass central member, a pulling grip should be used. The strength member(s) should be attached independently. This can be accomplished by weaving the strength member into the fingers of the grip, and then taping it together. All strength members should be gripped equally to ensure a proper distribution of tension.
Figure 3: Pulling Grip
Pre-terminated Fiber Optic Cable Assemblies
The factory pre-terminated fiber-optic cable assemblies may be specified in project environments such as Data Centers. The assemblies can be ordered in either indoor (plenum) or outdoor versions, and different fiber counts, and in multimode or single-mode. A pulling eye can be factory installed on either end or on both ends of the cable. The pulling eye (and associated cable netting) will protect the pre-terminated ends during the pull. This product is a great time saver ensuring quality connections every time.
Pulling eye
The pulling eyes (and associated cable netting) are highly recommended. The pulling eye will facilitate the installation as well as protecting the pre-terminated ends during the pull.
For both regular and pre-connectorized cables, the maximum pull force is identified with the “installation maximum load” cable specification on our Datasheets.
Share this Post
latest post
-
 Split Ethernet cable into two February 10, 2019
 -
 What is Ethernet Patch Cables? February 5, 2019
 -
 Military Fiber Optic cable January 31, 2019
 -
 Networking cable types January 26, 2019
 -
 Fluke Ethernet cable Tester January 21, 2019
 -
 Molex Fiber Optic cable January 16, 2019
 -
 Buy Ethernet Cables online January 11, 2019
 -
 Harford County cable Network January 6, 2019
 -
 Serial to Ethernet cable January 1, 2019